Posts

Showing posts from November, 2020

3D Crafts

Image
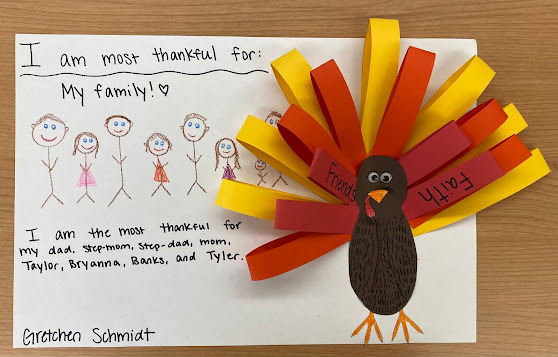
For this lesson, we talked about everything that we are thankful for. On a large piece of construction paper, we wrote one thing that we are the most thankful for on half of the sheet. We then illustrated a picture of what we are most thankful for. Underneath the picture, we wrote a sentence about what we are the most thankful for. Once we completed this part of the project, we began creating the turkey. We traced the turkey's body on the other half of the construction paper and then began tracing the stencil provided to make the feathers. There were three different colors (red, yellow, and orange) and each color was a different length. We bended each slip of colored paper in half and glued it onto the outline of the turkey's body. We repeated this step until we got through all of the colors and our turkey outline was full of feathers. On the red-colored construction paper, we added two more things that we are thankful for and wrote them on the feathers. After we finished gluin

Painting Lesson

Image
For the painting lesson, we painted our very own cacti and biomes. To start out this lesson, we presented a PowerPoint with the history of painting as well as some terminology relating to painting. We also presented a slideshow of biomes and provided a brief introduction to each one. We focused primarily on the desert biome and then played a fun, animated cactus song on YouTube. To begin, we started with painting our rock green. After our rock was completely covered in paint, we set it off the the side to dry. While we waited for that the dry, we began creating our biome on a sheet of white drawing paper. We folded the paper in half, and colored the bottom portion in crayon to add texture to the sand. We also added in a drawing of some more cacti and trees. We painted the top half with paint and created a sunset look. After our rock was completely dry, we glued on a set of googly eyes and then painted on our white specks to add texture to the cactus. After this step was complete, we pl

Paper Lesson

Image
The lesson focus for this project was paper. This project was unlike anything I have previously completed but it was a lot of fun. We learned about organic and geometric shapes. We also learned about Picasso and his famous Cubism paintings. After a short presentation, we began completing our own Cubism painting. We started off by making an eye on each side of the face, and then eyebrows, and then the lips. After completing the facial features, we divided the picture up into four different spaces. The requirement was to have at least four different colors and two different types of media. Once we completed this portion of the project, we proceeded to cut out the online and then cut it down into four separate pieces. After the pieces were all cut out, we cut the four sections into geometric and organic shapes and then glued them onto construction paper. To sum up this lesson, we wrote two facts about Picasso and two ways our pictures were different from our peers!  An extension activity

Print Making Quilt

Image
For this lesson, we used gel plates and stencils to create different patterns onto a piece of paper. We picked out whatever color of paint that we wanted and we also picked out our own stencils. After we painted the gel plate with our choice of color, we laid the stencil down and rolled over it with a roller. Once the pattern was visible on the plate, we put down the piece of paper and rolled over it again. After rolling over the piece of paper completely, we carefully peeled it off and then layered the gel plate with another paint color and stencil to create a pattern once again. We repeated this process over and over again until we completed multiple different patterns. We then cut out our patterns into small squares and glued them onto a piece of construction paper, creating a "quilt".  Extension Activity: I would bring in my quilt that my grandmother made me out of t-shirts and show the students all of the different types of patterns/materials that quilts can have! 

Drawing Lesson

Image
In this drawing lesson, the focus was on light and dark elements. We used black construction paper and a white colored pencil to show the different elements. In order to create the flashlight effect, we traced a pizza-shaped outline to form a flashlight figure. We put an animal half inside of the outline and colored it in with crayon, and put the other half of the animal on the black paper with the white colored pencil. We also added in other animals and trees to create a background and added in various texture patterns.  An extension activity for this project would be to have the students do a scavenger hunt around the classroom with the lights off and they would each have their own flashlight. I would place printed out images of animals, plants, and trees and the students would have to find them using only their flashlights.